
In fact, Golfweek rated this course as the #2 course you can play in Arizona in 2013. Being out a ways, the rates seem to be lower than the other premium offerings around Scottsdale.

I have played several courses in the area and Quintero is one of the tops. While We-Ko-Pa always astonishes me with immaculate conditioning, Quintero may get the nod for the best desert experience. The course is set up a little more rustic than the manicured Troon North courses (not that I can say anything bad about those). As of right now, the course has fewer homes lining the holes too. This will likely change as housing development is planned and streets and lots are already plotted and underway.

When I played, a temporary clubhouse was set up towards the bottom of the property near the 4th and 6th holes. The course climbs in elevation from here. This means a long cart ride from the pro shop to the practice range. Eventually a permanent clubhouse will exist up by the practice area.

The course was designed by Reese Jones and is a semi-private course Originally intended as the first of multiple courses that were to be part of a private community, things changed when the economy tanked.
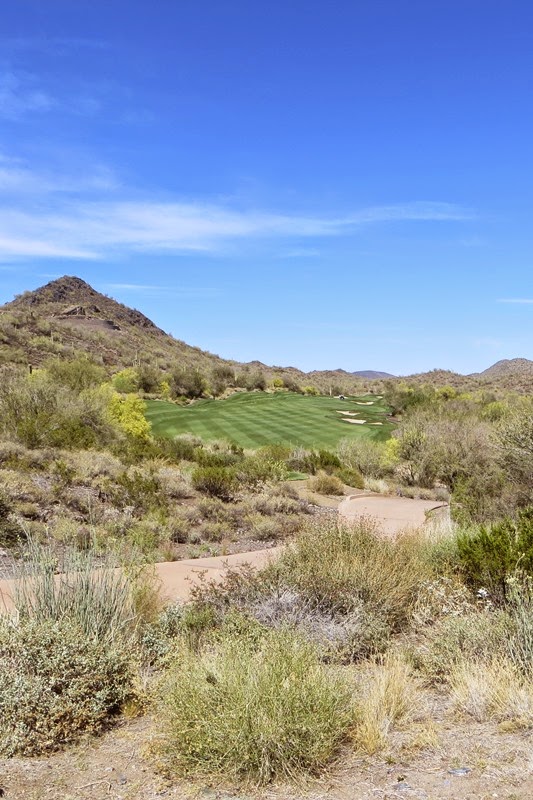
Reese did a masterful job working within the natural canyon walls to create a course with some tremendous elevation changes and holes framed by the surrounding desert. Of course, this means you need to bring your straight hitting game! The course routes in and out of the Hieroglyphic Mountains. A layout that is undeniably not easy, it is also fair provided you can hit the fairways. I am not sure a high handicapper would have the most fun here, unless they don't mind losing a lot of balls.
The elevation of the course is one of the really unique things. With the mountain topography seemingly every shot is either downhill (like all the par 3s) or uphill (like every other hole). And while no one will mistake the course for a parkland style course, the course mostly lacks the typical desert washes bisecting every hole of a true desert-placement-style course. That means most greens can be approached from the ground, in a bump and run style, if one were inclined to do so.

From the tips the course plays to a bruising 7208 yards with a Slope of 147 and a rating of 74.9. That is right up there with the toughest in the state (which I think is Desert Mountain Golf Club's Renegade Gold course). For non-masochists, there are 4 other distinct tees playing all the way down down to 5,307 yards. The scorecard offers 9 combination tee options so you are sure to find an experience to suit your taste and skill level.

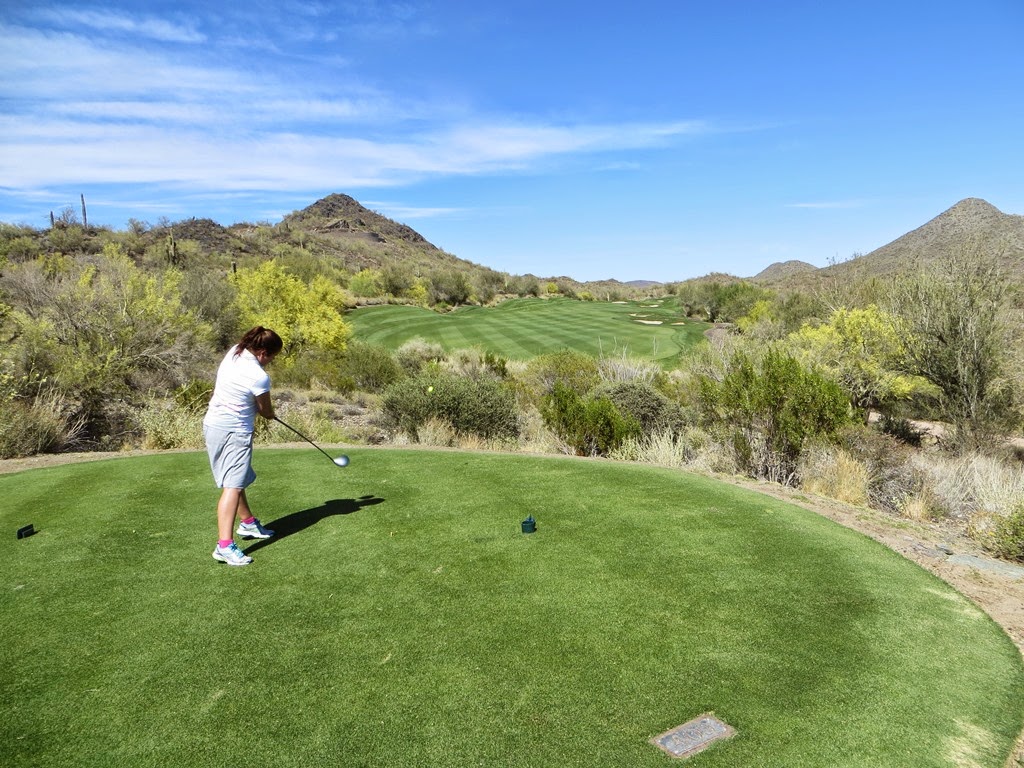
I had the great fortune to have played with my friends Keith and Michael, and my wife Lisa. The guys played from the Silver (6,435 yards 70.3/137) while Lisa played up from the Jade.

Lets get on to the course itself.
Hole 1 Par 4
Hcp 13
405/388/370/359/303 yards
Your first tee shot of the round is a knee-knocker! Get used to it as you will be seeing a lot of tee shots like this in your round.
The hole requires a carry from the island tees to a straight-ahead fairway. The is more room to the left than it looks like from the tees- but not a lot.

The fairway falls off to the right into the desert. Down the left is a little flatter but a large bunker sits down that side.


You can see from here the fairway bunker down the left side of the hole. This bunker is probably around 100 yards from the green. Another large green envelops the right side of the green. To the right is room to miss into a chipping area slightly below the green.

Behind the green falls off from the semi-domed putting surface. Be sure not to go long on your approach or your ball will likely bound across the cart path and into the desert.

Hole 2 Par 5
Hcp 7
571/545/520/476/428 yards
The tees are offset slightly making the start of this Par 5 splay like a dogleg right. The fairway is squeezed by the canyon down the left and a large bunker down the right. Down the extreme right side is also the 8th fairway playing back the other direction.

You should aim your shot down the right side as the hole does funnel from right to left.

The second shot should also play up the right side as the slope continues towards the green. Your second shot, if played short, offers a wide landing area. A long bunker does sit on the left side of the fairway about 90 yards out.

The green is protected left by a bunker sitting below the green. Another bunker is hidden from view to the right of the green. Again, behind the green the hole falls of, similar to the 1st.

Hole 3 Par 4
Hcp 5
406/390/369/330/299 yards
Suddenly we arrive to the tee facing a shot over water. Surreal in this desert landscape. The best play here is to hit to 150 yards out. This will put your ball just past the widest landing area of the fairway (That is about 180 yards out) and short of the bunkers that sit down the right side.


Michael hitting his second shot from the fairway on 3.

A look back from near the green of the hole divided by the desert.

The green is protected on approach by a huge bunker on the right, nearly the same size as the green. Missing to the left offers no room between the green and the desert. Likewise, missing long will also find the cacti.

Hole 4 Par 4
Hcp 3
460/438/399/316/278 yards
The holes keep getting tougher as we go. From the tee a long forced carry is required to this fairway.

The fairway is framed down the left side by a gaggle of bunkers. Down the right offers more room to miss. The hole plays straight ahead so a straight shot down the middle will offer no surprises.

The hole plays slightly uphill to the green so take an extra club in. The green is squeezed between to long bunkers sitting short on either side. There is room to miss long here but the green is already fairly deep so a miss long could lead to a long chip back if the pin is in the front.

Hole 5 Par 4
Hcp 11
374/352/334/315/284 yards
Another straight-ahead par 4. It plays uphill the whole way.

From the tee, no hazards await other than the omnipresent desert.

Take plenty of club on your second shot. A huge bunker covers the front of the green to snatch up any balls that don't make it to the green.

Hole 6 Par 3
Hcp 17
219/190/169/140/87 yards
One of the most jaw-dropping views you'll find awaits you as you ascend the hills after the 5th hole. The Par 3 6th is a dramatic signature hole of the course.

The 6th tee box is on top of the hill behind this house. This was taken from the 5th hole.
The effective yardage to the center of the green can be as much as 30 yards from the highest elevation of the back tee:
- 219=185
- 190=160
- 179=160
- 169=155
- 155=140
- 140=130
There is room to miss short right where a patch of fairway offers the only sanctuary off the green on this hole. Missing left is likely in the desert, though a bunker does line the left perimeter of the green.

Behind and right of the green is an enormous trap. Take aim and trust your distance! Hopefully the wind isn't up to fool with your club selection.

Hole 7 Par 4
Hcp 9
431/410/372/332/293 yards
You turn and head back up into the mountains on the 7th. A carry over the desert is required before reaching the fairway. Missing too far left here can find the water you saw off the 3rd tee.

The left side of the fairway is the better angle into this green. A long narrow bunker runs up to, and along, the green. The hole does rise up on your approach so an extra club is needed.

The green is narrow but very deep. Missing left or deep is OK, as there is room to recover. A miss down the right is going to be trouble though.

Hole 8 Par 5
Hcp 1
586/550/502/475/453 yards
The hardest hole on the course is a true 3 shot par 5. Your tee shot must lay up short of a ravine that frames the corner of this dogleg right. The landing zone for the tee shot is wide, made to look wider by the neighboring 2nd hole down the left.

The best location is center or left center of the fairway to offer the most favorable option on your second shot.

As you turn the corner, you must carry the ravine and then avoid a series of three bunkers that are in play up the right side.

The third shot then requires one more good shot to reach the elevated green, with the third bunker protecting the right side. An extra 2 clubs is a good bet to ensure you reach the putting surface in regulation.

Hole 9 Par 3
Hcp 15
212/188/162/139/83 yards
Another stunning tee shot is had for your second par 3 of the round. A downhill shot that must traverse water short to a green that sits diagonal off the back tees. Behind the hole the 17th climbs up the hills in the background.
A cluster of nine island tee boxes make the angle of this tee shot dramatically different.

Our tee box today was to the left, taking out some of the water and lining up length of the green with the tee shot.

Similar to the previous tee shot, this hole plays downhill and the effective yardage of the hole can be up to 30 yards shorter from the higher teeing areas.

The water feature runs across virtually the entire length of the hole. Even missing to the left, you can still find water.

Hole 10 Par 5
Hcp 10
521/515/485/471/409 yards
Holes 10, 11, and 12 zigzag back and forth parallel to each other and running east, west, and east. They are all fairly similar to each other- straight ahead par 4s with large fairway bunkers on one side of the hole and greens protected by more large traps.
The opening hole on the back 9 is the shortest par 5 on the course. Another carry is required off the tee to a fairway lined by 4 large bunkers down the right.
Typical of many desert courses numerous cactus victims still stand despite being barraged by shots off the tee.

Favor the left side to avoid the sand. The smart three shot play is to hit the three landing zones, each short of the bunkers down the left.

The hole rises slightly again from fairway to green so an extra club is not a bad idea.

The green is flanked short by a pair of bunkers. Another 2 bunkers sit directly behind the green. If you want to lay up on your second shot plan to hit to about 80 yards out. That is the widest part of the final landing zone and will take the two front bunkers out of play.

Hole 11 Par 4
Hcp 8
447/435/411/369/334 yards
Hole 11 plays back along the 10th hole. The 10th is off to the right and the upcoming 12th is to your left. Off the tee you must carry the desert. This time the left side hosts a pair or long bunkers.

In another common theme, the hole rises as you approach the green.

There is room to run the ball up to the green, but two large bunkers hug either side of the green.

Hole 12 Par 4
Hcp 4
435/410/384/361/334 yards
Turning back to the east, the 12th is another straight ahead par 4. Continuing the tradition of the last 2 holes 2 large fairway bunkers sit down the left side. There is more room to the right than it appears off the tee.

Again, the green is raised above the fairway and your second shot requires an additional club. Two more large bunkers sit on either side of this elevated green.

Hole 13 Par 3
Hcp 18
212/176/157/133/100 yards
The flattest par 3 on the course, you are offered a picturesque view of twin peaks of the Hieroglyphic Mountains. In front of the green, a stream empties into a pond that frames the left side of the hole and completely guards the green.

Past the water hazard, and before the green, is a large bunker. The green sits elevated above this trouble. A tough hole that requires you to carry the trouble completely. There is room to bail out to the right on this hole but the flat elevation finally makes club selection easy to play safe to the middle of the green.


The creek on the hole is just in front of the forward, Jade, tees.

Hole 14 Par 5
Hcp 2
552/541/527/427/382 yards
Continuing in the same direction as the last hole, you continue to head at the twin mountain peaks on this par 5, the toughest hole on the back.
A large landing area awaits where the fairway starts. You must carry the desert from the tees to this large area. The landing zone is framed by a bunker down the left and another that crosses in from the left, squeezing down the fairway in half up the right side.

Your second shot will need to avoid a series of bunkers that appear half way down the hole and run all the way to the green. Favor the left side here to avoid all of that trouble.

Your third shot in must split the sand that now runs up both sides of the hole.

Once more the hole rises towards the green, necessitating an extra club for proper distance.

Missing on your third shot can lead to a sand shot or four with the multitude of hazards.

Hole 15 Par 4
Hcp 14
379/358/339/321/284 yards
To my eye, a tough driving hole. Two large bunkers down the left require an accurate tee shot to the right of them.

While not the longest hole, you don't want too long of an approach into the green here.

The green is protected along the entire front side by a gigantic bunker.

To the left of the elevated green is another bunker. Yet again, grab an extra club here to make it to the elevated green.

Hole 16 Par 3
Hcp 14
225/201/189/160/108 yards
The last par 3 treats you to another gorgeous elevated vista. Sand runs down the length of the right side of this hole. The left is squeezed in by the desert. There is no room to miss here so account for the downhill and hit the green.
The elevation here adds effectively shortens this hole 10-20 yards depending on how high your tee box is located.

A good shot of the scale of the green side bunkers, as well as the greens, with Michael hitting out on the 16th green.

Hole 17 Par 4
Hcp 12
380/363/344/314/288 yards
Guess what? On the penultimate hole we have another par 4 that rises from tee to green and offers a slew of bunkers down one side of the fairway.

This hole actually doglegs slightly right. Favoring the left side will avoid the trio of hazards in play down the right.


The green is almost entirely fronted by a bunker on the right. Another large bunker sits off to the left of the green.

Again, an elevated green requires more club than your yardage would indicate. Missing long will be no good as the back of the green falls off into the desert behind.

Hole 18 Par 4
Hcp 6
434/425/404/369/292 yards
The final hole is a tough par 4 made challenging right off the bat by a trio of bunkers that frame either side of the fairway off the tee. The best shot is to aim down the left of the right bunker. If you hit that shot your ball will find the heart of the fairway beyond these hazards.

Missing to the left on this hole is trouble, as the hole falls off to the desert without a lot of room past the fairway.

The second shot is to an elevated (surprise) green that is skewed diagonally from your shot. A pair of bunkers protect either side of this green.
My ball landed just past the bunker on the left and somehow managed to stay on the slope, as shown in the picture below with the red circle. Despite defying gravity by ball did nothing else special on this hole. I carded a snowman to finish. Blah!

A view back down the hole. There is room to miss short as shown in this picture. If you do an easy chip can be made onto the green.

So there it is.
A true gem.
The beautiful desert setting frames a well thought out course. The par 3s are the courses highlight. Each of them is a true masterpiece. I would have a hard time naming another course that has a better set of par 3s. The par 4s are a bit redundant. The third is a standout. Pair the par 4s with the setting and they really don't seem boring during your round. Only when I write up this overview do I realize how similar they all seem.
The course conditions here are great. The greens are fast, and the fairways are very well maintained. A top shelf course, and one that I will definitely come back to again when I have the chance.
Make the drive, you will be glad you did!

No comments:
Post a Comment