Tuesday, November 29, 2016
Insane Golf Trick Shot
Wow. Just wow. The guy on top is just sick but heck I couldn't even do the ball bouncing the guy on the bottom is doing!
Monday, November 28, 2016
Chimera Golf Club Part 2
Back to Part 1
The hole drops downhill past the hill with the bunkers.

If you can hit a straight drive 260 yards from the tips you will find the slope that runs down towards the green. You can easily gain another 40 yards here. Even from atop the hill you are left with less than 150 yards into the green.

This green is well protected down the right- a side you surely want to avoid. There is room to miss to the left, provided you don't go long and find the large bunker behind the green. This is a large green at about 100 feet from front to back and nearly that from side to side. It does tend to all slope left and back to front.


There is actually a lot of room over the top of the desert down the right side so swing away. Down the left there is a small bunker at around 250 yards from the tips.
The approach in is wide and inviting encouraging you to go for it in two. There is a large bunker down the left 50 yards from the green. Another large bunker wraps the right side of the green. This green is not elevated at all making for a roll-up onto the putting surface possible.


The fairway is fairly large to hit off the tee. There is a large bunker down the left side of the fairway (though it plays straight on from the tee). Down the right of this hole the desert is fairly open but a drainage ditch runs down this side making it an area to stay away from. That bunker plays 250 yards from the back tees so it is reachable. The fairway actually also runs out less than 300 yards from the back tee so a driver here may not be needed on this shorter par 4.

From the fairway you must clear another swath of desert that traverses across the width of the hole at around 100 yards from the green.

The green is fairly flat but is fronted by a large bunker hugging the right corner and also protected behind with another large bunker that extends almost the entirety of the green.

This green is 100 feet deep so account for that in your club selection. Avoid the right side of the green and the 80 foot bunker that lies there. Another bunker sits back left between the green and the hillside that makes the backdrop of this hole.


From here you can see that the mound on the left which is about 280 yards marks the point where the hole falls downhill before rising again near the green.

Over the top of the mound on the right is more trouble with small trees lining the entire approach to the green.

A well placed drive can catch the down slope and lead to an approach that must play from the low spot in the fairway to a huge green that is elevated and guarded by a trio of bunkers short right.

A straight forward longer hole just avoid the sand left. A right side pin is the most accessible on another deep green.


The 16th is a short, potentially driveable hole. The hole does play uphill towards the green so it does have a little protection there. More worrisome are the two large bunkers that sit on the right side. The green is tucked behind these two traps making a greened drive one that must carry the length of the hole.
Down the right is the driving range, and down the left is OB with houses nearby. It is probably best to be conservative here and try for a tight approach.


Aside from the bunkers down the right side in front of the green, another pair of bunkers occupy the corners behind the green.

There is plenty of room for your drive but the left side offers the best angle into the green which is tucked down the right side of the hole.


The green is reachable on your second shot with a good drive, or another generous landing zone awaits. A large bunker lies on the right about 80 yards from the green. Another pair of bunkers await short right by the green. Again, best to stick down the left side of the hole where you can take this sand out of play.


From the right edge of the fairway, your second shot is a real test. Water up front, palms along the right, and a waterfall cascading along side the left side of the green. It is pretty much green or bust here!

Another view of the green taken from the 17th hole.

And one last look at the green as you approach from the cart path. The green is very deep at over 110 feet and has some serious undulations as it slopes from back to front.

Wolf Creek was jaw dropping roller coaster fantasyland golf
Conestoga was pure isolated desert golf
Rio Secco has the name cache and the glitz and glam to back it up
Yet while the other courses were memorable each in their own way, Chimera had 2 big things going for it:
1) The green fees are a downright steal compared to other options in the area. We got the twilight rate but were able to finish 18 before the sun set (just barely). The course was in great shape, the rental clubs were very nice, and I felt for what we paid we got much more value than I had expected.
2) The course is just plain fun to play. Sure, it is not the hardest course. Most of the holes are pretty straightforward. But if you want to get out and just have fun playing golf on a really well maintained course I would highly recommend trying out!


Chimera Golf Club
901 Olivia Parkway
Henderson, NV 89011
(702) 951-1500
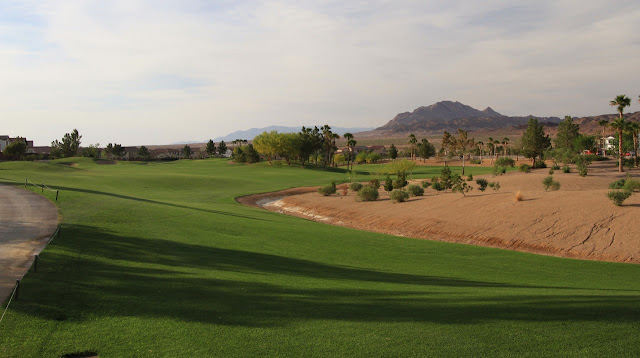
Hole 10 Par 4
410 | 387 | 361 | 336 yards
The par 4 10th is straight ahead but fairly narrow. The main feature to catch your eye off the tee are the 2 large bunkers carved into the hill in the right center of the hole. All down both sides is OB with the range to your right and houses down the left.The hole drops downhill past the hill with the bunkers.

If you can hit a straight drive 260 yards from the tips you will find the slope that runs down towards the green. You can easily gain another 40 yards here. Even from atop the hill you are left with less than 150 yards into the green.

This green is well protected down the right- a side you surely want to avoid. There is room to miss to the left, provided you don't go long and find the large bunker behind the green. This is a large green at about 100 feet from front to back and nearly that from side to side. It does tend to all slope left and back to front.

Hole 11 Par 5
538 | 524 | 505 | 463 yards
Another narrow hole that curves slightly to the right as you play. Off the tee your first concern is to carry the desert area in front of the tees. That should not be a problem as it is only 180 yards to reach the fairway. Still it does pinch the hole down visually for your tee shot.
There is actually a lot of room over the top of the desert down the right side so swing away. Down the left there is a small bunker at around 250 yards from the tips.

The approach in is wide and inviting encouraging you to go for it in two. There is a large bunker down the left 50 yards from the green. Another large bunker wraps the right side of the green. This green is not elevated at all making for a roll-up onto the putting surface possible.

Hole 12 Par 4
408 | 387 | 367 | 338 yards
This par 4 occupies the north western corner of the property and is a more typical desert style target hole. Off the tee you must locate the island fairway which is an island surrounded on all sides by sand. This landing zone turns to the right, as this hole doglegs around to eh right as you play it.
The fairway is fairly large to hit off the tee. There is a large bunker down the left side of the fairway (though it plays straight on from the tee). Down the right of this hole the desert is fairly open but a drainage ditch runs down this side making it an area to stay away from. That bunker plays 250 yards from the back tees so it is reachable. The fairway actually also runs out less than 300 yards from the back tee so a driver here may not be needed on this shorter par 4.

From the fairway you must clear another swath of desert that traverses across the width of the hole at around 100 yards from the green.

The green is fairly flat but is fronted by a large bunker hugging the right corner and also protected behind with another large bunker that extends almost the entirety of the green.

Hole 13 Par 3
183 | 165 | 149 | 121 yards
Turning opposite the way you just played 12 is the longer par 3 13th. This hole requires carrying part of the same desert sands that you encountered on the last hole.This green is 100 feet deep so account for that in your club selection. Avoid the right side of the green and the 80 foot bunker that lies there. Another bunker sits back left between the green and the hillside that makes the backdrop of this hole.

Hole 14 Par 4
426 | 408 | 390 | 355 yards
A tough par 4 where the desert in the distance can come into play off the tee. Hitting down the right side can find the desert and also lead to one of the harder approaches on the course. The desert area there is actually a pretty large mound making for an awkward stance if you hit into that area. Aim down the left side on this tee shot.
From here you can see that the mound on the left which is about 280 yards marks the point where the hole falls downhill before rising again near the green.

Over the top of the mound on the right is more trouble with small trees lining the entire approach to the green.

A well placed drive can catch the down slope and lead to an approach that must play from the low spot in the fairway to a huge green that is elevated and guarded by a trio of bunkers short right.

Hole 15 Par 3
200 | 181 | 152 | 130 yards
A pretty par 3 with mountains in the background and a string of palms lining the back of the hole make for a great view.A straight forward longer hole just avoid the sand left. A right side pin is the most accessible on another deep green.

Hole 16 Par 4
299 | 281 | 266 | 248 yards
One of the cool things at Chimera are all the little things they do to make a unique experience. I already showed the Chimera crossing signs. Similarly, the hole signs are also unique. Large barrels are used for the signs. Well done.
The 16th is a short, potentially driveable hole. The hole does play uphill towards the green so it does have a little protection there. More worrisome are the two large bunkers that sit on the right side. The green is tucked behind these two traps making a greened drive one that must carry the length of the hole.
Down the right is the driving range, and down the left is OB with houses nearby. It is probably best to be conservative here and try for a tight approach.


Aside from the bunkers down the right side in front of the green, another pair of bunkers occupy the corners behind the green.

Hole 17 Par 5
526 | 510 | 411 | 380 | 345 yards
Maybe the prettiest tee shot on the course, you have a slightly elevated vantage point. You must carry water and avoid the large bunker down the left side.There is plenty of room for your drive but the left side offers the best angle into the green which is tucked down the right side of the hole.


The green is reachable on your second shot with a good drive, or another generous landing zone awaits. A large bunker lies on the right about 80 yards from the green. Another pair of bunkers await short right by the green. Again, best to stick down the left side of the hole where you can take this sand out of play.

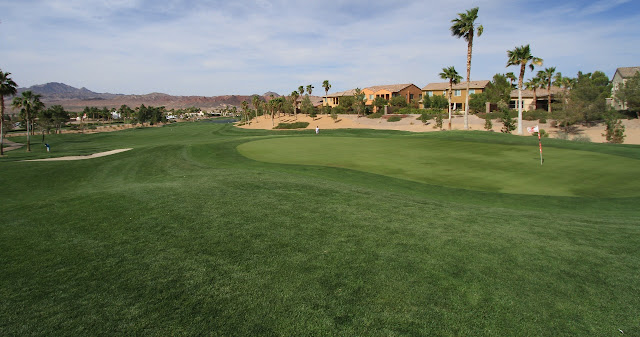
Hole 18 Par 4
440 | 411 | 380 | 345 yards
We were fighting the sun on the last hole which is one of the best holes on the course. While 17 might be the best tee shot, 18 is the best finish. Aim your tee shot again down the left. A ridge runs along the right side and anything hit over there can have a blind approach shot to the undulating green protected by water.
From the right edge of the fairway, your second shot is a real test. Water up front, palms along the right, and a waterfall cascading along side the left side of the green. It is pretty much green or bust here!

Another view of the green taken from the 17th hole.

And one last look at the green as you approach from the cart path. The green is very deep at over 110 feet and has some serious undulations as it slopes from back to front.

Conclusion
Of the courses I played on my Vegas trip, Chimera may have been the biggest surprise.Wolf Creek was jaw dropping roller coaster fantasyland golf
Conestoga was pure isolated desert golf
Rio Secco has the name cache and the glitz and glam to back it up
Yet while the other courses were memorable each in their own way, Chimera had 2 big things going for it:
1) The green fees are a downright steal compared to other options in the area. We got the twilight rate but were able to finish 18 before the sun set (just barely). The course was in great shape, the rental clubs were very nice, and I felt for what we paid we got much more value than I had expected.
2) The course is just plain fun to play. Sure, it is not the hardest course. Most of the holes are pretty straightforward. But if you want to get out and just have fun playing golf on a really well maintained course I would highly recommend trying out!


Chimera Golf Club
901 Olivia Parkway
Henderson, NV 89011
(702) 951-1500
Wednesday, November 16, 2016
Chimera Golf Club Part 1
The last course I played in my trip out to Las Vegas was Chimera Golf Club in the gated community of Tuscany, which is located 15 miles east of the strip in Henderson. This club was named Tuscany Hills Golf Club but was re-branded to Chimera in October 2015 when Tom Burke bought the course.
 Chimera was designed in 2003 by Ted Robinson Jr. That makes the course one of the newer offerings in Sin City.
When we visited, the building housing the bar and pro shop seemed pretty bare bones. There is no opulent clubhouse and pro shop like you may find elsewhere in some of the other courses. However, the proshop is well stocked with a lot of unique merchandise featuring their logo, which I think looks pretty dang sharp. There is a casual bar/restaurant called Slice 19 on site as well.
I believe there is an event center located behind the clubhouse for hosting weddings and events but that is a separate building I did not go into.

While the course is the center of a planned community, it doesn't suffer the claustrophobia that can plague a lot of these type of courses. Construction continues to surround the course as you can see from this Google image. I dont see the continues development causing problems as the holes are sufficiently wide to not be a problem, even once all the lots are full.

The course tops out at 6,906 yards from the tips. In keeping with the club's name the tees are themed off of the mythical Chimera:


The pair of bunkers that are the primary defense off the tee also mark where the hole turns to the left slightly. From this point the approach in is less that 150 yards.

On your second shot you must avoid a trio of bunkers that sit on either side of the fairway. The approach directly up the fairway is open and while the hole plays ever so slightly uphill, running your approach onto this green is easily done.

The green is fairly deep at just over 100 feet and slopes from back to front.

On your second shot there is not much danger unless you want to go for the green. Short right, is another long bunker. Closer to the green, guarding the front left corner is another smaller round bunker.

The green is elevated from the fairway to prevent long shots from rolling up. Another wide bunker runs all the way across the back of the green, hidden from view.


Mounding down the left side can lead to a friendly kick back towards the fairway. After negotiating that right side bunker you have another cluster of green side bunkers to contend with on your second shot into the green.

Wayward shots into the rough can find trouble behind the conifers that dot the right side of the hole.


Beautiful views of the mountains and desert extend beyond this hole as you play up to the green.

The approach in must again negotiate flanking bunkers on either corner of the green. Another bunker sits behind the green.

This large tri-pronged green offers some tough pin placements, especially if located in the extreme back left corner.


The 6th is a par 5 that is not too long but one that controls your decision off the tee by placing a cluster of bunkers 250 yards off the back tee. These bunkers choke the hole down to a narrow little chute. A 270 yard drive can fly that hazard and expose the green to be reached in two.
Laying back and hitting something around 230 yards is the safe play.

The second shot, should you lay back behind the bunkers is an easy one to a wide landing zone.

The only real remaining hazard here is a long bunker extending along the left side of the green.


On your second shot a cross bunker juts out from the left to front the green, which is again elevated from the fairway.

The green is a large oval with a spine cutting across it diagonally. Aside from the bunker which covers the front of the green, another one wraps around the back. There is room to miss your approach to the right here.


There is actually room to miss the green on pretty much any of the sides. It is a much more visually intimidating hole that it actually plays.


As you come up the hole you can see how the hole slopes towards the water as it wraps around to the tucked green.

From the left side of the hole it plays much harder with a forced carry all the way to the green.

From the right side of the hole, it is a much more forgiving angle. Here the biggest hazard are the trio of bunkers that wrap the right side of the green.

More great desert views off to the right as you approach the green.


When we visited, the building housing the bar and pro shop seemed pretty bare bones. There is no opulent clubhouse and pro shop like you may find elsewhere in some of the other courses. However, the proshop is well stocked with a lot of unique merchandise featuring their logo, which I think looks pretty dang sharp. There is a casual bar/restaurant called Slice 19 on site as well.
I believe there is an event center located behind the clubhouse for hosting weddings and events but that is a separate building I did not go into.

The Chimera sculpture near the driving range is one of the first things you will see when you pull up to drop off your clubs.
While the course is the center of a planned community, it doesn't suffer the claustrophobia that can plague a lot of these type of courses. Construction continues to surround the course as you can see from this Google image. I dont see the continues development causing problems as the holes are sufficiently wide to not be a problem, even once all the lots are full.

The course tops out at 6,906 yards from the tips. In keeping with the club's name the tees are themed off of the mythical Chimera:
| Tee | Yardage | Rating | Slope |
|---|---|---|---|
| Pegasus | 6,906 | 72.4 | 132 |
| Serpent | 6,530 | 70.4 | 127 |
| Goat | 6,135 | 67.7 | 123 |
| Lion | 5,616 | - | - |
The course features Bermuda greens and fairways. A lot of mature palm trees are on property along with water in play on 4 of the holes. These 4 holes happen to make good use of the water, making for some of the more memorable holes during the round.
For my round I played with my wife and one of her co-workers. I played my own clubs but they rented clubs. The clubs provided were nice new Callaway sticks.

The course offers a nice large range to warm up on. There is (or will soon be) a golf academy offered at Chimera with club fitting and launch monitors available.

The range area is kept dormant with artificial turf greens. A great idea in my opinion in the desert climate. The range tops out around 280 yards from the furthest but a net at the end makes hitting through the range unlikely.

There is also a putting green across the parking lot from the range. It also features a chipping area and a large bunker for sand practice. One more green sits next to the first tee.
Hole 1 Par 4
394 | 374 | 356 | 321
The opening hole sits adjacent to the clubhouse. It plays nearly straight away with just a slight bend to the left as you approach the green. Off the tee you do have to clear water that sits directly in front of the tee boxes. This should not really come into play, being only about 100 yards to carry; but with the first tee jitters, one never knows.

Down the left side of the hole is a fairly open gravely desert-type terrain. A smattering of trees runs down this area making shots hit down this side no certainty to advance.
More pressing trouble lies in the form of a pair of bunker down the right side of the hole. It is around 250 yards to reach these from the back tees.
From the forward tees, the water is no longer in play and the hole offers up a pretty wide landing zone.

The pair of bunkers that are the primary defense off the tee also mark where the hole turns to the left slightly. From this point the approach in is less that 150 yards.

On your second shot you must avoid a trio of bunkers that sit on either side of the fairway. The approach directly up the fairway is open and while the hole plays ever so slightly uphill, running your approach onto this green is easily done.

The green is fairly deep at just over 100 feet and slopes from back to front.

The look of this hole sets the tone for the rest of the course. While I was playing I couldn't help but think that this course feels a lot like TPC Scottsdale. What I mean by that is the expanse of green pretty much everywhere with the exception of the highly manicured "desert" zones that frame the holes and hold up the traditional tree hazards.
Hole 2 Par 5
563 | 543 | 508 | 468 yards
From the elevated tees you can see the green as the first par 5 hole plays straight ahead. Down the left runs a strip of desert that slopes back towards the fairway. Down the right side is a long bunker that sits right in the landing zone off the tee.
In order to clear that bunker you need a 300 yard carry from the tips, so it is best just to avoid that and play down the left side as the hole slopes back towards the right.

On your second shot there is not much danger unless you want to go for the green. Short right, is another long bunker. Closer to the green, guarding the front left corner is another smaller round bunker.

The green is elevated from the fairway to prevent long shots from rolling up. Another wide bunker runs all the way across the back of the green, hidden from view.

Hole 3 Par 3
189 | 167 | 141 | 117 yards
A mid length par 3, this green is surrounded by a trio of large bunkers. There is room to miss short right but the green is crowned to repulse those short shots.

Hole 4 Par 4
424 | 400 |374 | 339 yards
Another straight ahead par 4. A bunker lurks down the right side. 275 yards will clear that trouble but then lands you in the narrowest part of the fairway.

Mounding down the left side can lead to a friendly kick back towards the fairway. After negotiating that right side bunker you have another cluster of green side bunkers to contend with on your second shot into the green.

Wayward shots into the rough can find trouble behind the conifers that dot the right side of the hole.

Hole 5 Par 4
357 | 339 | 323 | 307 yards
A short par 4 that uses well placed defenses to negate the lack of distance. Off the tee, only about a 200 yard tee shot is needed. Anything more than that begins to flirt with the trio of bunkers that sit on either side of the fairway and choke down the hole to a narrow chute.

Beautiful views of the mountains and desert extend beyond this hole as you play up to the green.

The approach in must again negotiate flanking bunkers on either corner of the green. Another bunker sits behind the green.

This large tri-pronged green offers some tough pin placements, especially if located in the extreme back left corner.

Hole 6 Par 5
536 | 518 | 506 | 468 yards
After finishing the 5th you must cross Olivia Parkway to reach the 6th. Clever signs like this one give no doubt where you are.

The 6th is a par 5 that is not too long but one that controls your decision off the tee by placing a cluster of bunkers 250 yards off the back tee. These bunkers choke the hole down to a narrow little chute. A 270 yard drive can fly that hazard and expose the green to be reached in two.
Laying back and hitting something around 230 yards is the safe play.

The second shot, should you lay back behind the bunkers is an easy one to a wide landing zone.

The only real remaining hazard here is a long bunker extending along the left side of the green.


Hole 7 Par 4
449 | 413 | 383 | 354 yards
A long narrow par 4. This hole tends to slope from right to left for the first half of its play. Off the tee a large bunker sits down the left side. Another smaller bunker sits on across the fairway on the right.

On your second shot a cross bunker juts out from the left to front the green, which is again elevated from the fairway.

The green is a large oval with a spine cutting across it diagonally. Aside from the bunker which covers the front of the green, another one wraps around the back. There is room to miss your approach to the right here.

Hole 8 Par 3
160 | 142 | 126 | 110 yards
A short to mid par 3 with plenty of hazard around the putting surface. Immediately in front of the tee boxes is a sandy swatch of ground. This leads to a drainage ditch and a brick retaining wall.
Once across that ditch you have a large bunker sitting short left and the more obvious water hazard that runs all along the right side of the green.
A smattering of palms frame the back of the hole with a Tuscan style tower in the standing in front of a beautiful stretch of mountain ridges.

There is actually room to miss the green on pretty much any of the sides. It is a much more visually intimidating hole that it actually plays.

Hole 9 Par 4
404 | 380 | 352 | 317 yards
The last hole on the front is a dogleg left that wraps around water as you approach the green.
Off the tee your aiming point should be the just left of left most bunker. That bunker is only 250 yards from the back tees so it is in play.
Also in play is the water down the left. It is a bit farther to reach that at 280 yards. There is also a hidden bunker over there that may save your ball from getting wet.

As you come up the hole you can see how the hole slopes towards the water as it wraps around to the tucked green.

From the left side of the hole it plays much harder with a forced carry all the way to the green.

From the right side of the hole, it is a much more forgiving angle. Here the biggest hazard are the trio of bunkers that wrap the right side of the green.

More great desert views off to the right as you approach the green.

On to Part 2
Subscribe to:
Posts (Atom)